
One of my tasks at my current position is to be the system administrator of a shared hosting server. We have a dedicated server hosted in OVH and we are using Plesk (always updated to the latest version ;- of course).
Plesk has a very nice tool to make periodic full and incremental backups via FTP. We have a backup policy which is very simple but good enough for our needs and for the domains we host. We keep about 1 month of backups in the FTP server.
Additionally, I like keeping a bunch of older backups. Why? A few years ago we had this old WordPress site that had been hacked but nobody realized it until three months later… so we did not have a copy of the clean site in our FTP server. These old backups are there just in case something like this happens again.
Looking for a cloud storage service to archive those backups, I came upon OVH Cloud Storage and decided to give a try. This OVH service has several pros: is powered by Open Stack which is an open-source project, has a reasonable price and is hosted by the same company that hosting our dedicated server which means that all the bandwidth and network traffic will be kept inside the OVH infrastructure.
So I decided to manually upload the full backup once a month to one of our storage containers in OVH.
The problem
Uploading small files is very easy. I already have ruby scripts that uploads small files (about a few tens of megabytes). However, the full backup file is larger than 250 Gigabytes. The ruby scripts I was using were raising exceptions, complaining that the file was too big, so I had to find out about how open stack and swift handle such big files.
Meet the manifest…
So, I want to upload a file backup.tar.bz2 to a swift container called “backups”. Apparently, for files bigger than a certain threshold, the file should be split into smaller chunks that are stored in a different swift container, called “backups_segments”. Then, a manifest file is created in the “backups” container with information about how to recreate the big file from the chunks stored in the “backup_segments” container.
Fortunately, the swift command takes care of splitting the file, uploading the segments and creating the manifest: you just have to pass an option with the segment size. That’s easy!!
python environments
The first step is to install the swift command and it’s dependencies. The first time I tried to do that with pip, I run into dependency problems with some python libraries. swift needed some python libraries with higher versions than those installed by the operating system, so I could not install it with pip right away.
Now, upgrading the system libraries was not an option. As I told you, the server is running Plesk to provide a shared hosting environment and the last thing you want to do is make a mess with the system libraries. You do not want to add more package repositories than strictly needed and you do not want Plesk to start throwing errors in your next upgrade because some library cannot be upgraded.
I do not know python, but I know ruby. In ruby you can run different ruby versions in the same machine an have different sets of gems for different projects without conflicting with each other. So… is there anything out there similar to bundler or RVM in the python world? The answer is virtualenv: it creates and isolated environment to run your python scripts. Yeah, I know… virtualenv doesn’t work like bundler and it’s a different beast. But that’s how I found out about it: trying to do in python something similar to what I do in ruby.
By default, the system runs python 2.7 which is enough for what we want to achieve, so we stick to that version (remember: we do not want to make a mess with the system libraries). Let’s install virtualenv in the first place:
>pip install virtualenv
Now, we create a folder in our machine called swift_env and create a python environment inside it:
> mkdir swift_env
> virtualenv swift_env/
New python executable in /home/user/swift_env/bin/python
Installing setuptools, pip, wheel...
done.
Now let’s activate our new environment:
> source /home/user/swift_env/bin/activate
(swift_env) [user@localhost ~]#
That was easy, isn’t it!!! As I told you, we can now install whatever library we need and leave the system libraries alone.
Install swift
Once we are in our environment we can install swift
(swift_env) [user@localhost ~]# pip install python-swiftclient python-keystoneclient
Authentication: get a list of containers
Once we have the swift command installed in our environment, we will check that everything is fine by getting a list of all the available containers. To do that we run the swift list command:
(swift_env) [user@localhost ~]# swift list
Auth version 1.0 requires ST_AUTH, ST_USER, and ST_KEY environment variables
to be set or overridden with -A, -U, or -K.

Auth version 2.0 requires OS_AUTH_URL, OS_USERNAME, OS_PASSWORD, and
OS_TENANT_NAME OS_TENANT_ID to be set or overridden with --os-auth-url,
--os-username, --os-password, --os-tenant-name or os-tenant-id. Note:
adding "-V 2" is necessary for this.
…which fails because we are not authenticated. The first thing we have to do is decide which authentication version to use. At the time of writing, OVH allows version 2 so we need to find all the parameters that swift needs to authenticate us: the auth url, username, password, tenant name, tenan id and the zone in which your OVH container is hosted.
Where can we find the? Just login to your OVH account and follow these steps (I’m sorry, the screenshot is in Spanish):
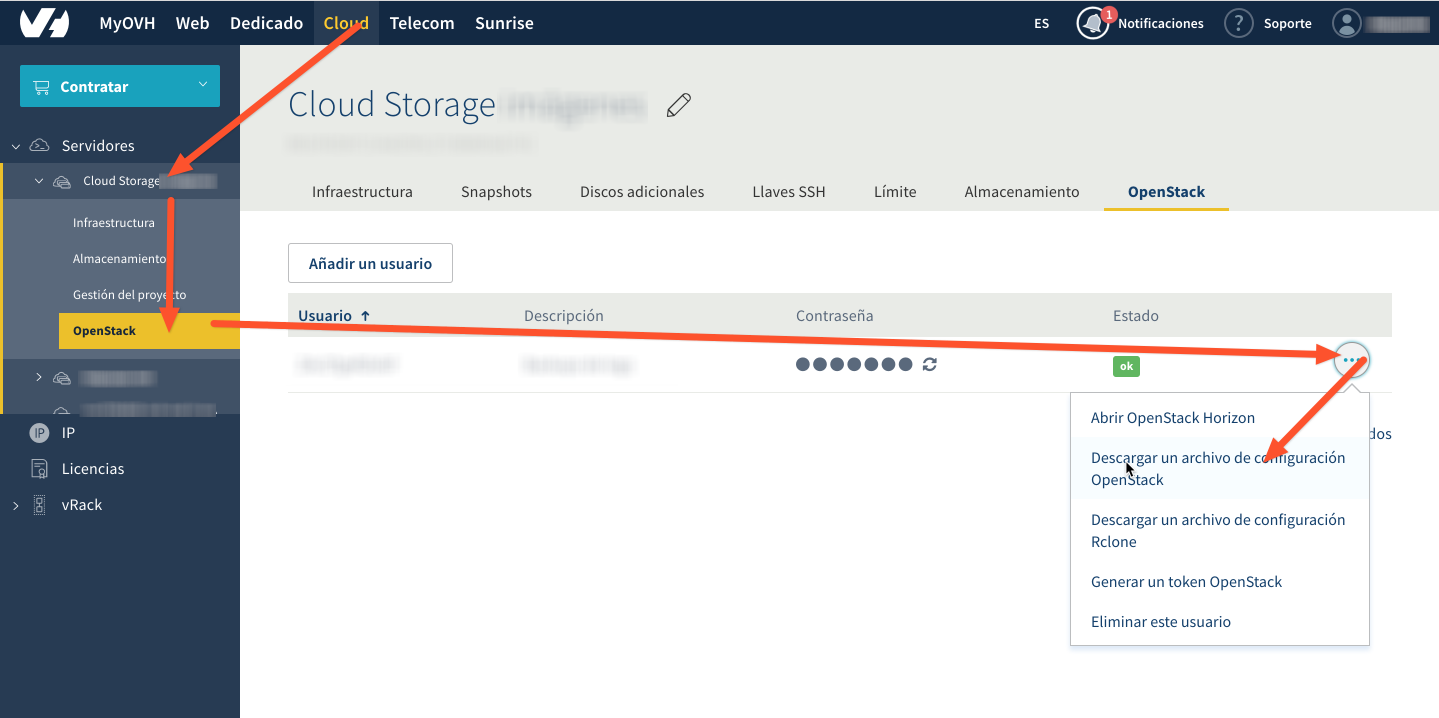
If you follow the steps shown in the screenshot, you will download a file called openrc.sh with all the information you need (except the password).
To avoid storing all this authentication information in the bash history of our user, we will create a file called swift_auth.sh wich will set all those environment variables that the swift command uses:
# swift_auth.sh
export OS_AUTH_URL=https://auth.cloud.ovh.net/v2.0/
export OS_USERNAME=XXXXXX
export OS_PASSWORD=XXXXXX
export OS_TENANT_NAME=XXXXXX
export OS_TENANT_ID=XXXXXX
export OS_REGION_NAME=XXXXXX
Once we have the file, we can source it and run the swift client again to get a list of our containers:
(swift_env) [user@localhost ~]# source swift_auth.sh
(swift_env) [user@localhost ~]# swift list -V 2
backups
Upload our big file
Once we know that we can “talk” to our containers, we are ready to upload our big file! We use swift upload command and pass the segment size so swift will split the file in chunks automatically for us (and create the manifest)
swift upload -V2 -S 5000000000 --use-slo --object-name backup.tar backups backup.tar

backup.tar segment 7
backup.tar segment 4
backup.tar segment 0
backup.tar segment 3
backup.tar segment 9
backup.tar segment 5
backup.tar segment 2
backup.tar segment 6
backup.tar segment 1
backup.tar segment 8
backup.tar segment 15
backup.tar segment 18
backup.tar segment 13
backup.tar segment 11
backup.tar segment 17
backup.tar segment 10
backup.tar segment 14
backup.tar segment 16
...
where the options are:
-Sis the segment size in bytes (5Gbytes)--use-slotells swift to create a Static Large Object. A detailed explanation of this option can be found here and here--object-nameThe default object name would be /path/to/backup.tar. With this option we set the object name to /backup.tar inside the containerbackupsis the container name.
And that’s it, after a few minutes our file is uploaded and we can delete it from our servers.
The next step would be to write a shell script that automates all the process: it gets the file from the FTP server and uploads it to the OVH Cloud Storage… but that will be in another post (should I ever write the script).