TL;DR;
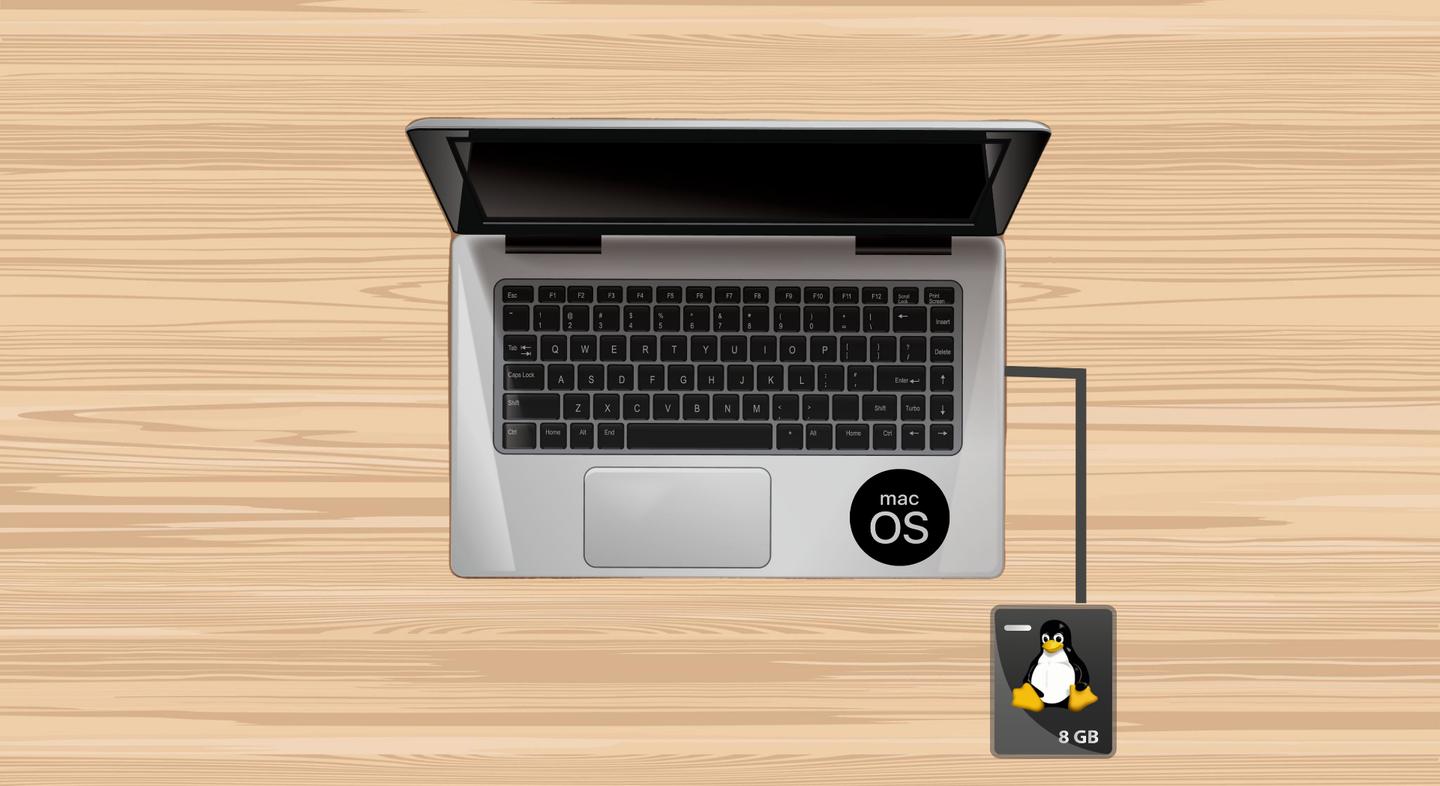
I spent some time installing Ubuntu on a MacBook Pro, only to decide to step back when I had almost everything ready. The reasons were:
- The lack of support for Bluetooth
- Fans not working in a way similar to how they worked in macOS, and I was concerned about how this could affect the hardware in the long term
- Poor performance when using web browsers like Chrome or Brave
- Problems with the sound: I was not able to connect a microphone to it
☹️ Bad luck… I’ll need another way to work on a Linux box. You can read the full story below.
Table of contents
- TL;DR;
- Table of contents
- Hardware
- Which computer should I use?
- Choosing a Linux Distribution
- Step 1: Create a bootable USB stick
- Step 2: Install Ubuntu
- Step 3: Preparation for running the playbook
- Stepping back
- Conclusion
- References
Hardware
This is what I used:
- An external SSD SATA III drive to install Linux (I don’t want to mess up with my internal drive). I used a Kingston A400 SSD SA400S37 of 240 GB.
- A SATA III to USB 3.1 adapter from Startech.com
- An external USB stick to boot and run the installer
Which computer should I use?
I had two computers I could use to install Linux:
- MacBook Pro 16’ from 2019
- MacBook Pro 13’ from 2015
At first, I tried to install it in the MacBook Pro 16’ from 2019. It’s my main computer right now, and a very powerful one. Unfortunately, after doing some research, I found out this gist which describes all the things that work and, more important, all those that doesn’t. Not having Wi-Fi is a problem, I need to move around with the laptop (that’s what a laptop is meant for, anyway) so I don’t want to go from here to there with a network cable following me around everywhere. Also, after reading the gist I came to the conclusion that making it work seemed like a good side-project to learn a few things, but that’s not what I’m looking for. I want a Linux computer up and running in as fast as possible and, this is very important, I need to be able to work on that computer.
After ruling out the MacBook Pro from 2019, I had a look at the MacBook Pro from 2015. A little research showed that the latest LTS Ubuntu version (20.04 at the time of writing) had support out-of-the-box for all the hardware except Bluetooth. I decided to give a try.
Choosing a Linux Distribution
I made a list of candidates:
- Debian testing: I loved to use Debian testing for my working computer back in 2005-2006. However, I think that this was going to more time and effort that what I’m willing to invest on this, so I ruled it out.
- Linux Mint: based on Ubuntu/Debian, robust and easy to use.
- Manjaro: also easy to use but based on Arch Linux. I ruled it out because I wanted a Debian based Linux distribution.
- The good old Ubuntu Desktop.
Finally, I decided to use Ubuntu Desktop. Why? I already knew it and had support for almost all the hardware, so I thought it would be the most effective distribution to use.
Step 1: Create a bootable USB stick
To prepepare everything for the installation, I will use the MacBook Pro 13’ from 2015 running the latest version of macOS Big Sur.
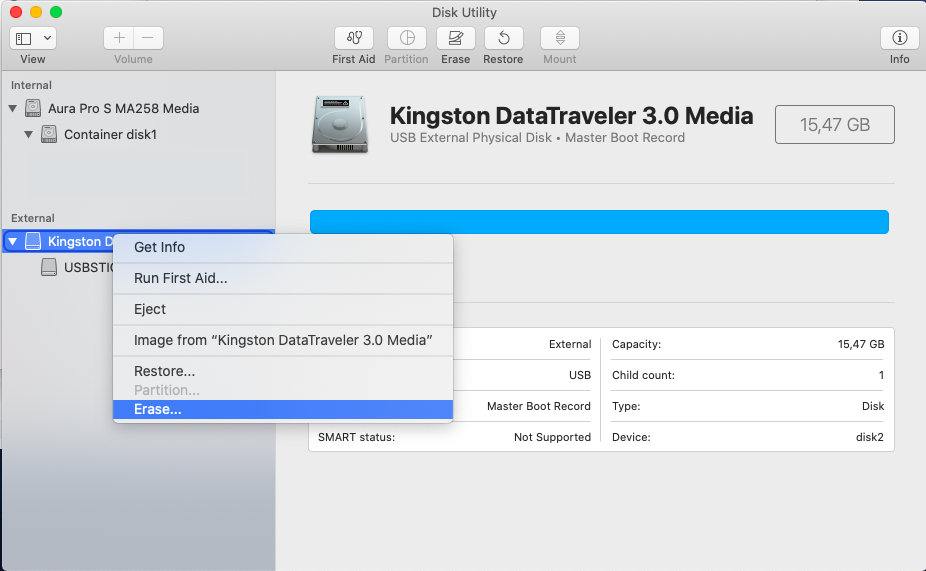
Plug in the USB Stick and open the Disk Utility application. On the left-hand pane, look for the USB Stick drive and
follow the next steps:
- On the left-hand pane, locate the drive for the USB Stick and right click on the drive
- Select
Erase
- In the pop-up window select the MacOS Extended (Journaled) file system
- Select the
GGUID Partition Tablescheme - Click on
Erase
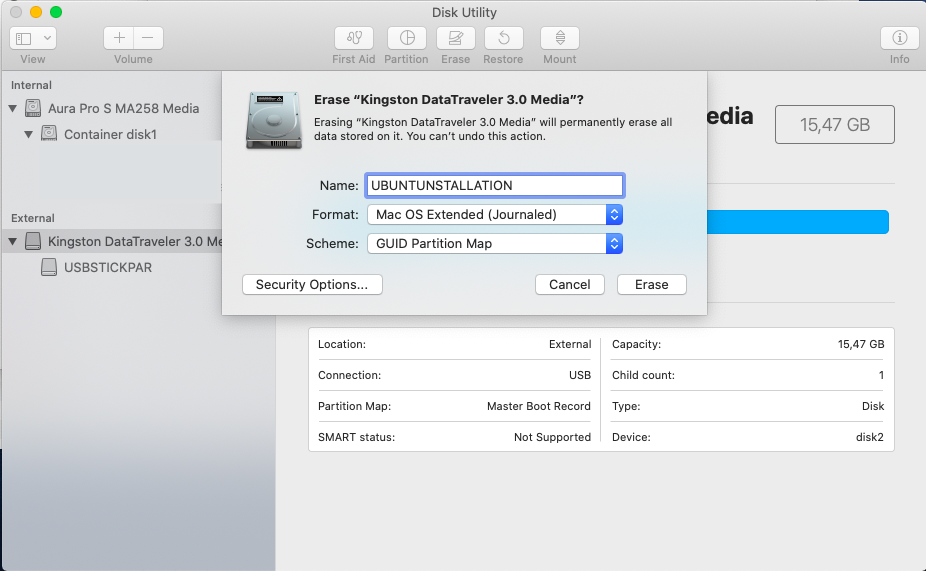
This will erase the drive, create an empty file system, and create the partition table that we need to boot from the USB drive.
Once we have the partition table in place, we will “burn” the Ubuntu ISO image into the USB stick. Go to the
Ubuntu Desktop download page and get the latest version of the ISO image. We will
save it as ~/Downloads/ubuntu.iso.
To “burn” it, we will use the terminal and a bunch of commands.
Find out the device name of the USB Stick
Run the following command:
> diskutil list
/dev/disk0 (internal, physical):
   #:                       TYPE NAME                    SIZE       IDENTIFIER
   0:      GUID_partition_scheme                        *500.1 GB   disk0
   1:                        EFI EFI                     209.7 MB   disk0s1
   2:                 Apple_APFS Container disk1         499.9 GB   disk0s2

/dev/disk1 (synthesized):
   #:                       TYPE NAME                    SIZE       IDENTIFIER
   0:      APFS Container Scheme -                      +499.9 GB   disk1
                                 Physical Store disk0s2
   1:                APFS Volume OWC Aura Pro SSD - Data 37.0 GB    disk1s1
   2:                APFS Volume Preboot                 24.8 MB    disk1s2
   3:                APFS Volume Recovery                525.8 MB   disk1s3
   4:                APFS Volume VM                      1.1 GB     disk1s4
   5:                APFS Volume OWC Aura Pro SSD        11.2 GB    disk1s5

/dev/disk2 (external, physical):
   #:                       TYPE NAME                    SIZE       IDENTIFIER
   0:     FDisk_partition_scheme                        *15.5 GB    disk2
   1:               Windows_NTFS UBUNTUINSTA             15.5 GB    disk2s1
Looking at the output of the diskutil command, we can get the name of the device we are looking for: /dev/disk2.
We will unmount it before we continue:
> diskutil unmountDisk /dev/disk2
Unmount of all volumes on disk2 was successful.
Convert iso to IMG
Before “burning” the image, we need to convert the file that we downloaded from the ISO to the IMG format.
We will use the hdiutil command to do that:
> hdiutil convert -format UDRW -o ~/Downloads/ubuntu.dmg ~/Downloads/ubuntu.iso
Create the USB Drive
Once we have the image in the IMG format, we can “burn” it to the USB Stick using the dd command:
> sudo dd if=~/Downloads/ubuntu.dmg of=/dev/rdisk2 bs=1m
⚠ When we run this command, we should make sure that we are using the correct device name. Be careful, because if you use the wrong device you might end up corrupting your system disk and loosing data. ⚠
Step 2: Install Ubuntu
Keep you USB stick plugged in and turn off the MacBook Pro. We plug in the SSD External drive in which we want to
install our Linux Desktop. Restart your computer and remember to press the ALT key while the computer starts. When
you are asked, select to boot from the USB device. This will boot the Ubuntu installer.
We will not go into the details of the installation process since we just performed a standard installation. We did nothing fancy here. As a reminder for myself, I’ll only mention that during the installation, we selected the following options:
- Download updates during the installation
- Install third party software for graphics and Wi-Fi hardware and additional media formats
After the installation finishes, turn off the computer and unplug the USB stick. Start it, and once again
remember to press the ALT key. When you are asked, select the external USB Drive and let Ubuntu desktop start.
Congratulations! We have Ubuntu running in our MacBook Pro. Let’s install all the software we need to do our job.
Step 3: Preparation for running the playbook
Having reached this point, we need to do two things:
- Install the missing drivers so all our hardware works: FaceTime camera and the fans
- Install all the applications we need to do our jobs
Instead of doing it manually, we created an Ansible playbook to do it for us. But to be able to run the playbook, we need to install several packages before.
Install pip3 and other system packages
Install python packages pip3 and distutils-extra for python3
> sudo apt install python3-pip python3-distutils-extra
Since our playbook uses curl, we also need to install it:
> sudo apt-get install curl
Install python-apt
Our playbook uses the apt ansible module. This module depends on another python module called python-apt.
Unfortunately, this module is not kept up-to-date pypi and if you try to python-apt it using pip3, the installation
fails (more info in this comment in github)
We need to install the module python-apt from somewhere else… Let’s do it!
- Install the package
libapt-pkg-dev: this package installs the fileapt-pkg/hashes.h(and other files, but this is the one we are interested in), that pip3 will need later when we install thepython-aptmodule:
> sudo apt-get install libapt-pkg-dev
- Go to https://salsa.debian.org/apt-team/python-apt and find out what is the last version of this repository. At the time of writing, the latest version was 2.1.7
- Find out the URL in github to download the source code in tar.gz format. In our case, the URL was https://salsa.debian.org/apt-team/python-apt/-/archive/2.1.7/python-apt-2.1.7.tar.gz
- Install the module using pip3:
> pip3 install https://salsa.debian.org/apt-team/python-apt/-/archive/2.1.7/python-apt-2.1.7.tar.gz
Install Ansible
We are ready to install Ansible. We will install it inside a virtual environment, so we can have multiple Ansible versions available in our computer. The playbook that we want to run uses ansible 2.10, so let’s go:
- Install the module
virtualenv
> pip3 install virtualenv
- Add
~/.local/binto your path
> export PATH=$PATH:~/.local/bin
- Add this last step to your
.bashrcfile so it will be there the next time you open a terminal - Create a virtual environment called
ansible2.10
> virtualenv ansible2.10
- Activate the environment:
>. ansible2.10/bin/activate
(ansible2.10) >
- Install Ansible ```bash (ansible2.10) > pip3 install ansible
We are ready now to run the playbook!!!

## Step 4: Running the playbook

Get the playbook from [this repository](https://github.com/alfonsoalba/linux-in-macbook-pro-13-from-2015). Once downloaded,
make sure you run the playbook using a user that can run admin commands using `sudo`. Get some popcorn and run it:
bash
(ansible2.10) > ansible-playbook -K playbook.yml BECOME password: … ```
Enter the password to become root and let the playbook run. It will do the following:
- Install software and it’s dependencies. We need Slack, Libreoffice, Evolution, WhatsApp, ToggleTrack, etc.
The playbook will use
apt,snaporflatpakdepending on the software we want to install. You can look at the playbook to see the source used to install each package - Compile the drivers to be able to use the FaceTime camera
- Install
macfanctldso the fans are turned on when the temperature is too high - Install docker and docker-compose
After it finishes, we can say that we are done: Congratulations! We have a fully functional working Ubuntu Desktop running on our MacBook Pro from 2015.
Stepping back
Once everything is installed, we can start working. And with working I mean do my job: run Ansible playbooks, open websites, check my email, look at my calendar, access files in the cloud, attend to video calls… This is what we found out when we started using the computer to do actual work:
- The fans do not work in the same way they do in macOS. The module can either turn it on and off, while in macOS they run at different speeds.
- I have no Bluetooth because there are no drivers available. Although not critical, this was very annoying.
- The microphone was not working. Sound was playing okay, but I couldn’t make the microphone work. I tried to fix it, because I had the feeling that there was something wrong with the pulse configuration. Unfortunately I couldn’t figure it out.
- Opening a few tabs in the browser made the computer fans spin constantly… there was something going on with the hardware acceleration and maybe the drives of the graphics card.
After trying to fix the issues for a few hours, I decided to step back and don’t use Linux in this computer. The main reason was the way the fans were working: I don’t want to damage any component of the computer due to lack of proper cooling. Also, the issue with the microphone was critical, because without a working microphone, I can’t attend to online meetings. I also tried and external USB audio card but had the same problem with it. I have the feeling that it’s something to do with the configuration of pulse, but I couldn’t find out what was it.
Conclusion
I was able to install and run Ubuntu 20.04 in the MacBook Pro 13’ from 2015. The installation of all the software and hardware drivers was easy. It was a productive exercise for me, since it’s been a long, long time since the last time I had to compile and install drivers for the Linux Kernel. I’ve also learned about snap and flatpak, two ways of distributing software for Linux that were new to me… I’m used to the good-old package managers like apt or yum.
Unfortunately, a few things made me step back:
- not being able to configure the microphone
- the simple on/off setup for the fans (I don’t want to damage the computer)
- the low performance that I was getting from the graphics card
What do I mean with step back? It means that I will not use this computer to work under the Linux operating system. I need to find another way 🤔 Stay tuned!
References
- Non-affiliate amazon links:
- https://www.amazon.es/gp/product/B00XLAZODE/ref=ppx_yo_dt_b_asin_title_o01_s00?ie=UTF8&psc=1
- https://www.amazon.es/gp/product/B01N5IB20Q/ref=ppx_yo_dt_b_asin_title_o01_s00?ie=UTF8&psc=1
- https://itsfoss.com/create-bootable-ubuntu-usb-drive-mac-os/